TL;DR:
- Hiding short hair with extensions requires careful placement and blending techniques to create a natural look. Using lightweight extension methods like tape-in or fusion bonds within weight limits ensures concealment without strain. Proper sectioning, strategic positioning above the occipital bone, and blending methods eliminate visible shelf effects and promote seamless integration.
Short hair can be fully concealed with extensions when you use the right method, correct placement, and professional blending techniques. The most effective approach combines tape-in or fusion bond extensions, a total weight of 100–150 grams, and a point-cut or slide-cut layering technique to eliminate the visible “shelf” effect. Placement above the occipital bone, away from the crown and part line, keeps attachment points hidden even in wind. This guide covers how to hide short hair with extensions from extension selection through to daily care, giving you the knowledge to achieve a natural, long-lasting result.
Which extension types work best for hiding short hair?
The extension method you choose determines how natural your result looks. Tape-in extensions are best suited to fine-to-medium density short hair, lasting 6–8 weeks per application. Their flat, sandwich-style bond sits close to the scalp and creates minimal bulk, which is exactly what short hair needs.
Fusion bonds, also called K-tip extensions, use a keratin-based adhesive applied with a heat tool. They suit very short or highly layered cuts and last 3–5 months. The individual bond size gives you precise placement control, which matters when your natural hair offers limited coverage.
Sew-in extensions require braiding the natural hair as a base. For very short hair, there is simply not enough length to create secure, flat braids. This makes sew-ins a poor choice for most women with short hair, and professional stylists consistently advise against them in this context.
| Extension method | Best for | Lifespan | Concealment rating |
|---|---|---|---|
| Tape-in | Fine to medium short hair | 6–8 weeks | Excellent |
| Fusion/K-tip | Very short or layered cuts | 3–5 months | Excellent |
| Sew-in | Medium to long hair only | 6–8 weeks | Poor for short hair |
| Clip-in | Occasional wear, any length | Reusable | Good with styling |
Pro Tip: Keep your total extension weight within the 100–150g range for short hair. Going heavier creates visible bulk at the roots and puts unnecessary strain on fine strands.
Adding only 5–15 cm of length is advisable for a realistic result. A dramatic length jump from a short bob to waist-length hair rarely looks natural, and the transition point becomes much harder to conceal.
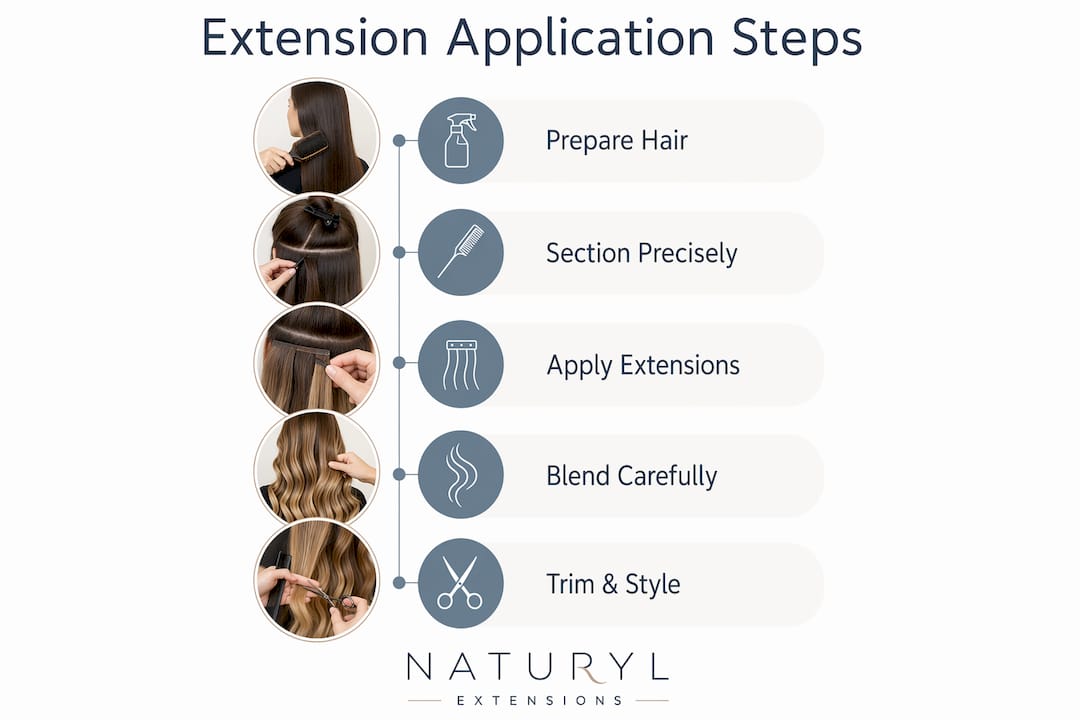
How should you prepare and section short hair before applying extensions?
Clean, precise sectioning is the foundation of good concealment. Sectioning into quadrants using a U-shaped or inverted V pattern gives you organised, manageable sections that allow even extension distribution across the head.
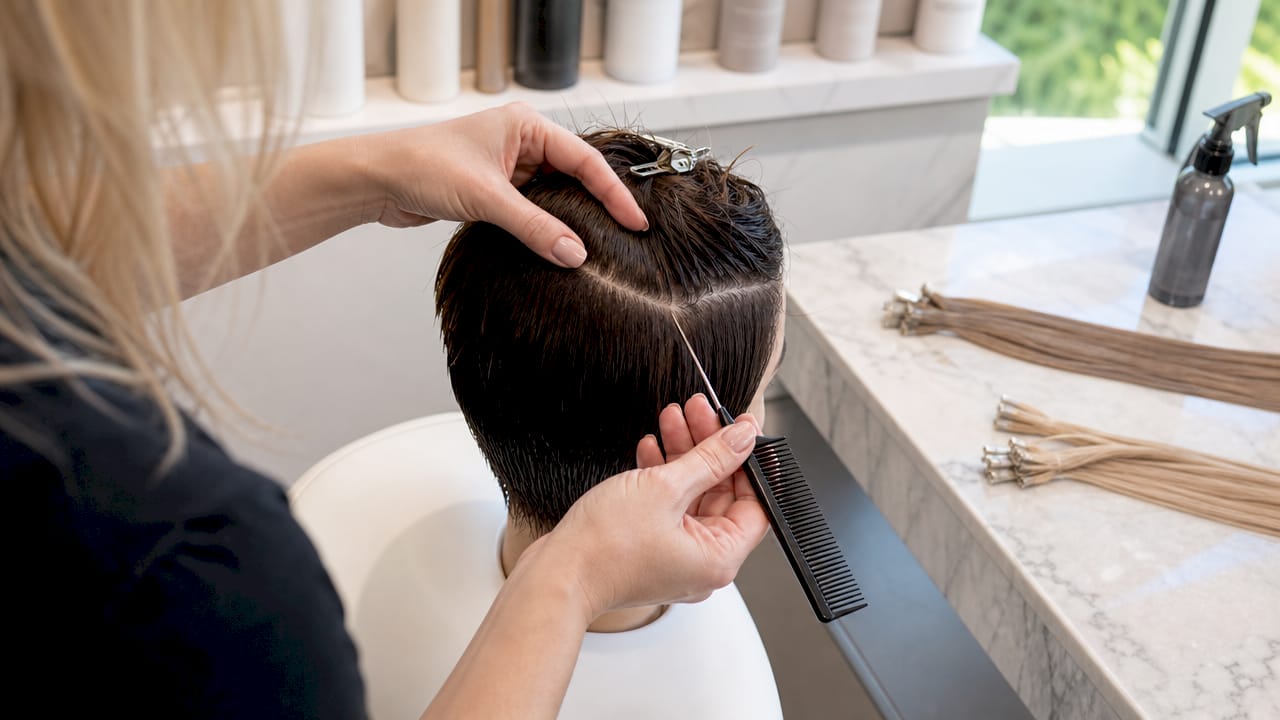
Work from the nape upward. Clip each completed section away from your working area so it does not interfere with the section below. Isolation per section prevents tangling at the bonds and produces a more even, natural flow once the extensions are in place.
The tools you need before you begin:
- Tail comb for clean, precise parting
- Sectioning clips (at least 12) to hold hair out of the way
- Paddle brush to smooth each section before application
- Heat protectant spray if using fusion bonds
- Mirror set (front and back) to check placement accuracy
Pro Tip: Tension management during application is critical. Apply gentle, consistent tension to each section. Pulling too hard causes scalp discomfort and can loosen bonds prematurely.
Lightly misting each section with water before combing helps you see the true parting line. This small step prevents crooked sections that throw off the entire placement pattern.
Step-by-step techniques to blend extensions with short hair
Blending is where most people go wrong, and it is the single most important skill for natural concealment. The shelf effect occurs when the blunt ends of your natural hair sit on top of the extension weft, creating a visible horizontal line. A slide-cut or point-cut technique on your natural hair before application removes this line by creating a feathered, graduated finish.
Follow these steps for a natural result:
- Layer your natural hair first. Ask your stylist for a point-cut or slide-cut before your extension appointment. This creates movement at the ends and removes the blunt line that causes the shelf effect.
- Start at the nape. Apply your first row of extensions just above the hairline at the nape. Work upward row by row, keeping each row parallel and evenly spaced.
- Place extensions above the occipital bone. The occipital bone placement rule keeps bonds hidden under the natural hair above, even when the wind moves your hair.
- Avoid the crown and part line. Placing extensions too close to the crown or your natural part exposes bonds immediately. Leave at least 2–3 cm of clearance from both areas.
- Check coverage from all angles. Use a hand mirror to inspect the back and sides before moving to the next row. Catching a poorly placed bond early saves significant time.
- Curl or wave the hair after application. Curling integrates the shorter natural layers with the extension length, softening any visible transition point. A loose wave works particularly well for bobs and lobs.
- Try a half-up style for events. Pulling the top section into a half-up style conceals the upper placement area while showing off the extension length below.
Pro Tip: For expert blending results, ask your stylist to trim the extensions after application, not before. Cutting them while they are on your head accounts for your unique head shape and hair growth pattern.
The most common mistake is over-applying extensions in one area to compensate for thin coverage. Spreading bonds evenly across the head produces a far more natural result than clustering them in one spot.
Troubleshooting common issues when hiding short hair with extensions
Visible bonds are the most frequent complaint, and they almost always result from placement that is too high or too close to the part line. Moving bonds 2–3 cm further from the part and ensuring each row is fully covered by the hair above resolves this in most cases.
Scalp strain and discomfort after application signal that the extension weight is too heavy or the bonds are placed too close to the roots. Reducing the total weight to within the recommended 100–150g and repositioning bonds slightly lower resolves both issues without compromising coverage.
Common problems and their fixes:
- Visible blunt line at the extension join. Book a point-cut trim with your stylist. This is a cutting technique issue, not a placement issue.
- Bulkiness at the nape. You have applied too many wefts in a small area. Remove one row and redistribute the bonds across a wider section.
- Extensions slipping on fine hair. Fine hair needs a rougher surface for bonds to grip. A light texturising spray on each section before application improves hold significantly.
- Discomfort after 48 hours. This usually means bonds are too close to the scalp. A professional stylist can reposition them without removing the full set.
- Visible bonds in wind. Placement is too high. Extensions placed above the occipital bone stay hidden even when hair moves.
Heat styling around bonds requires care. Always apply a heat protectant and keep styling tools at least 2 cm away from the bond itself. Excessive heat on keratin bonds causes them to soften and slip. If you are unsure about heat safety around your specific bond type, consult your stylist before using hot tools at home.
Essential daily care and styling tips for a natural look
Daily maintenance keeps your extensions looking natural and extends the time between professional appointments. The goal is to keep the natural hair and extensions moving as one unit, not as two separate layers.
Dos and don’ts for daily care:
- Do brush from the ends upward using a loop brush or soft-bristle extension brush
- Do apply a lightweight, residue-free leave-in conditioner to the mid-lengths and ends
- Do use a heat protectant every time you use hot tools
- Do sleep with hair in a loose braid or plait to prevent tangling at the bonds
- Don’t apply conditioner or oil directly to the bonds or tape tabs
- Don’t rub the hair vigorously with a towel after washing
- Don’t use heavy waxes or thick pomades near the roots
Pro Tip: A silk or satin pillowcase reduces friction on bonds overnight. This one change noticeably extends the life of tape-in extensions between refit appointments.
Refreshing your look between appointments is straightforward. A light mist of water and a diffuser on low heat revives curls or waves without stressing the bonds. For straight styles, a quick pass with a wide-tooth comb and a small amount of smoothing serum on the ends restores the polished finish.
Key takeaways
Hiding short hair with extensions requires the right extension type, precise placement above the occipital bone, and a point-cut or slide-cut blend to eliminate the shelf effect.
| Point | Details |
|---|---|
| Choose the right method | Tape-ins suit fine to medium short hair; fusion bonds suit very short or layered cuts. |
| Respect weight limits | Keep total extension weight within 100–150g to avoid strain and visible bulk. |
| Placement is everything | Position bonds above the occipital bone and away from the crown and part line. |
| Eliminate the shelf effect | A point-cut or slide-cut on natural hair before application removes the visible blunt join. |
| Maintain daily | Brush from ends upward, protect bonds from heat and oil, and sleep in a loose plait. |
What I have learned about short hair extension concealment
The biggest misconception I encounter is that adding more length automatically creates a better result. Women with short bobs often request a dramatic jump in length, believing the extra length will hide the join more effectively. The opposite is true. A modest added length of 5–15 cm blends far more convincingly because the transition point is gradual, not abrupt.
The second thing I have learned is that layering is misunderstood. Clients often resist the idea of cutting their natural hair before extension application, worrying it will make their hair shorter. Layering is not about removing length. It is about creating movement so that natural hair and extensions flow together rather than sitting in two distinct layers.
Patience matters more than any single technique. The women who achieve the most natural results are those who take the time to section carefully, check placement from multiple angles, and resist the urge to rush the process. Extensions on short hair reward precision. Give the process the attention it deserves, and the result will genuinely surprise you.
— Sam
Extensions designed for short hair wearers
Naturylextensions specialises in Remy human hair extensions designed to sit invisibly against the scalp and blend naturally with your own hair. The invisible wire extensions are particularly well suited to short hair because they are lightweight, require no bonds or heat tools, and can be fitted and removed in minutes. For women who want added length without committing to a permanent method, they offer a practical everyday solution.
Naturylextensions also offers thinning hair fill-ins for women whose short hair is also fine or sparse, adding volume precisely where it is needed. All products use ethically sourced Remy hair and come with a free exchange policy. Visit Naturylextensions to find the right match for your hair colour, length, and lifestyle.
FAQ
What is the best extension type for very short hair?
Fusion or K-tip bonds are the best choice for very short or highly layered hair, as their individual application allows precise placement. Tape-ins are the preferred option for fine to medium density short hair.
How much weight should extensions add to short hair?
The recommended total weight for short hair extensions is 100–150 grams. Going above this limit causes scalp strain and creates visible bulk at the roots.
How do I stop my extensions from showing on short hair?
Place bonds above the occipital bone and at least 2–3 cm from your part line. A point-cut or slide-cut on your natural hair before application removes the shelf effect that makes extensions visible.
Can I use clip-in extensions on short hair?
Clip-in extensions work on short hair for occasional wear, particularly when styled with curls or waves to blend the layers. They are less suitable for everyday use as the clips can be harder to conceal without sufficient natural hair to cover them.
How long do extensions last on short hair?
Tape-in extensions last 6–8 weeks on short hair before a refit is needed. Fusion bonds last 3–5 months, making them the longer-lasting option for women who want a semi-permanent result.