


Tired of spending hours in salons for extensions that damage your natural hair? You’re not alone. Many UK women struggle with time-intensive appointments and harsh application methods that compromise hair health. Invisible wire Remy human hair extensions offer a refreshing alternative: quick, damage-free installation you can master at home in under an hour, delivering the fuller, natural look you’ve been craving without the salon drama.
Table of Contents
Key takeaways
| Point | Details |
| Quality prerequisites | High-quality Remy human hair and proper sectioning tools ensure natural, secure results without damage. |
| Installation speed | Invisible wire extensions install in 30 to 45 minutes with minimal risk to natural hair. |
| Common mistakes | Precise sectioning and secure wire placement prevent loosening, discomfort, and breakage. |
| Maintenance matters | Proper daily care extends extension life to 8 weeks whilst protecting natural hair health. |
| Method comparison | Alternative extension types vary significantly in speed, damage risk, and natural appearance. |
Prerequisites and quality considerations
Starting with the right foundation determines whether your extensions look natural or artificial. Quality matters more than you might think.
Remy human hair is non-negotiable for durability and realistic texture. This hair type maintains its cuticle alignment, preventing tangling and ensuring your extensions blend seamlessly with your natural hair. Ethically sourced Remy human hair extensions from UK suppliers ensure consistent quality and reduce environmental impact, making sustainable choices easier. When selecting extensions, prioritise ethical hair extension selection to support responsible sourcing practices.
Your natural hair condition directly impacts installation success. Hair must be completely clean, fully dry, and thoroughly detangled before you begin. Wet or damp hair prevents proper wire grip, whilst tangles create uneven distribution that shows through styling.
Essential tools checklist:
-
Invisible wire hair extension strands (Remy human hair)
-
Sectioning clips (minimum 6 pieces)
-
Fine-tooth comb for precise parting
-
Tail comb for detailed sectioning
-
Hand mirror for checking back areas
| Hair condition | Preparation requirement |
| Clean, product-free | Wash 24 hours before installation |
| Completely dry | Air dry or blow dry on cool setting |
| Fully detangled | Brush thoroughly from ends to roots |
| No recent treatments | Avoid chemical processes 2 weeks prior |
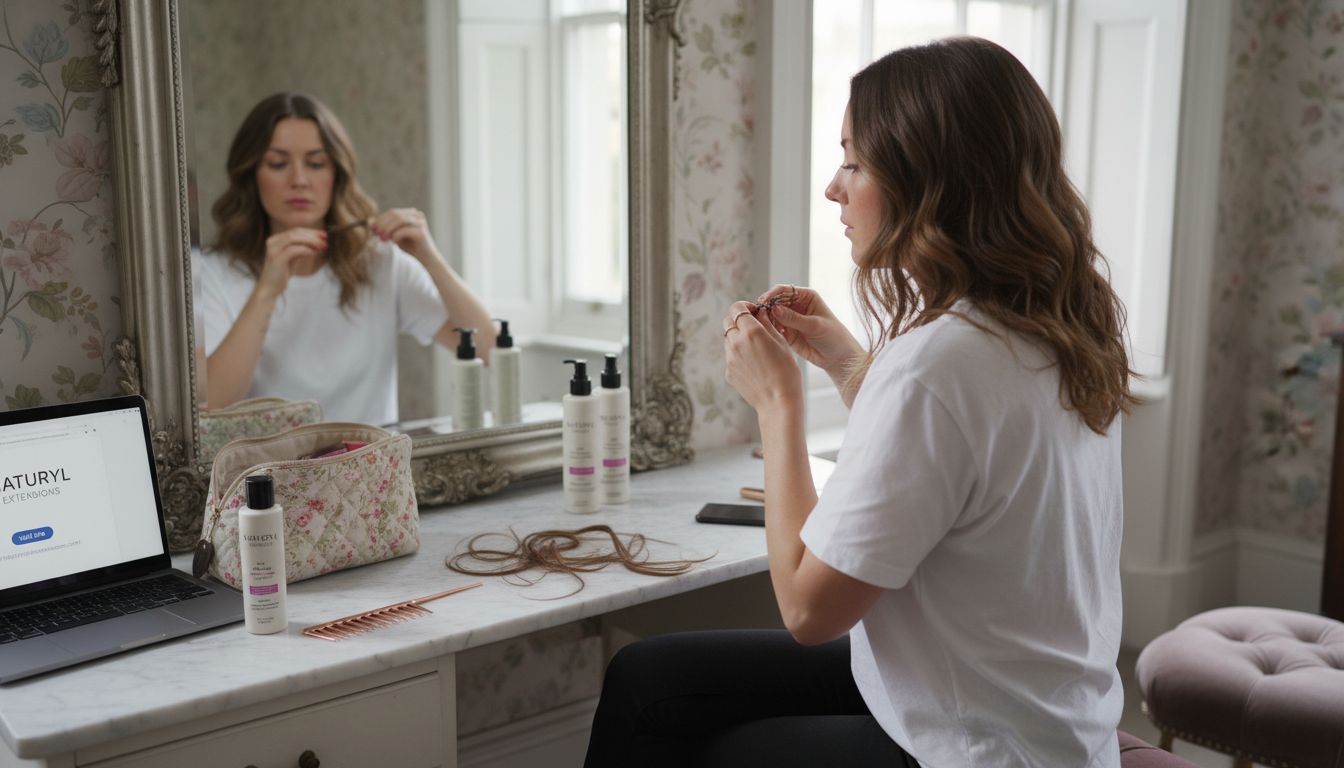
Pro Tip: Set up your workspace near a large mirror with good overhead lighting. Position a second mirror behind you to monitor back sections easily. This simple setup prevents installation errors that require time-consuming corrections.
Your environment matters too. Choose a comfortable chair at the right height, eliminating neck strain during the 30 to 45 minute process. Keep all tools within arm’s reach on a clean towel or tray.
Step-by-step installation guide
Mastering the installation sequence transforms a potentially frustrating experience into a straightforward routine. Follow each step precisely for professional results.
Detailed installation process:
-
Prepare your hair foundation. Brush your natural hair thoroughly, removing every tangle from root to tip. Part hair horizontally at ear level, clipping the top section away securely.
-
Create your first section. Using your tail comb, separate a thin horizontal section approximately 1cm wide at the nape of your neck. The section should be uniform in thickness and about 5 to 8cm long.
-
Thread the invisible wire. Hold your natural hair section taut but not tight. Slide the invisible wire strand underneath, positioning it as close to the scalp as comfortable without causing tension. The wire should sit flat against your head.
-
Secure the placement. Gently wrap the wire ends around the hair section, crossing them once to lock the extension in place. Check that the wire feels comfortable and sits invisibly beneath your natural hair.
-
Verify your work. Before moving to the next section, tug gently on the extension to confirm it’s secure. Run your fingers over the wire to ensure it lies flat without bumps or pressure points.
-
Continue upward systematically. Release another 1cm section directly above the first. Repeat the threading and securing process, maintaining consistent spacing between rows. Work from nape to crown in horizontal layers.
-
Blend and style. Once all extensions are placed, release all clips and brush through gently. Style your hair normally, checking that extensions move naturally with your own hair.
Pro Tip: Take a 30 second break after every three sections to check your posture and shake out any arm tension. This prevents fatigue that leads to sloppy placement in later sections.
The invisible wire extension tutorial demonstrates these techniques visually, helping you perfect your approach. Many users achieve damage-free hair extensions by following this methodical process.
Your installation speed improves with practice. First attempts may take 45 minutes, whilst experienced users complete the process in 30 minutes. Don’t rush your initial installations. Precision now prevents corrections later.
Common mistakes and troubleshooting
Even careful installers encounter challenges. Recognising problems early prevents lasting damage.
Sectioning errors top the mistake list. Improper hair sectioning occurs in over 40% of home installations, increasing breakage risk significantly. Taking sections that are too thick prevents wire from gripping properly, whilst excessively thin sections create visible gaps between extensions. Aim for that 1cm sweet spot consistently.
Frequent installation problems:
-
Uneven section thickness: Creates bumpy appearance and weak attachment points that loosen quickly
-
Wire threaded too tightly: Causes scalp tension, discomfort, and potential hair breakage at the root
-
Improper wire positioning: Results in visible wires when hair moves or wind blows
-
Skipped verification steps: Allows loose extensions to worsen before you notice the problem
-
Rushed installation: Leads to accumulated errors that compromise the entire result
Loose extensions signal threading issues. If you notice movement within the first 24 hours, gently remove that section and reinstall it. Don’t ignore loosening. Extensions that slip cause tangling and can pull on surrounding hair.
Visible wires indicate placement problems. The wire should sit completely hidden beneath your natural hair layer. If you spot wires in your reflection, that section needs repositioning lower against the scalp. Remove and reinstall rather than leaving obvious extensions.
Discomfort never resolves itself. Tension, pulling sensations, or scalp tenderness within the first hour means something is too tight. Remove the uncomfortable section immediately. Waiting risks damage to your natural hair follicles.
Quality issues manifest differently. If extensions tangle excessively despite proper installation, the hair quality may be poor. Genuine Remy human hair tangles minimally. Understanding invisible wire extensions UK standards helps you identify quality concerns early.
Safety considerations and damage prevention
Protecting your natural hair throughout the extension journey requires proactive measures, not reactive fixes.
Preparation protects better than treatment. Failure to use protective treatments before installation raises damage risk by over 25%, but invisible wire extensions with proper care drastically reduce this risk. Apply a strengthening conditioning treatment 48 hours before installation to fortify hair fibres against any stress.
Pre-installation protection checklist:
-
Deep condition hair 2 days before installation for maximum fibre strength
-
Avoid heat styling tools for 3 days prior to reduce existing damage
-
Skip chemical treatments (colour, relaxers, perms) for 2 weeks before installation
-
Ensure hair is completely healthy without existing breakage or weak spots
-
Trim split ends before installation to prevent them travelling upward
Ongoing monitoring catches problems early. Check your scalp daily for the first week, feeling for any tender spots or unusual tension. What feels fine during installation can become uncomfortable as you sleep and move naturally.
Warning signs demand immediate attention. Increased shedding near extension sites, visible thinning, persistent scalp irritation, or constant discomfort all indicate problems. Don’t wait to see if symptoms improve. Remove extensions and give your hair a break.
“The key to damage-free hair extensions info lies in respecting your natural hair’s limits and responding immediately to any distress signals.”
Removal technique matters as much as installation. Never pull extensions out hastily. Gently unwrap the wire, supporting your natural hair with one hand whilst carefully removing the extension with the other. Rushed removal causes more damage than weeks of proper wear.
Post-removal care helps hair recover. After removing extensions, deep condition immediately and avoid reinstalling for at least 48 hours. Your hair needs recovery time between extension periods to maintain its health and strength.
Alternative methods and tradeoffs
Choosing the right extension method depends on your priorities: speed, permanence, damage risk, or natural appearance.
Invisible wire extensions balance multiple benefits. They install quickly at home, cause minimal damage with proper technique, and create natural movement that mimics your own hair. The wire system distributes weight evenly, reducing stress on individual hair strands.
Clip-in extensions offer convenience but limitations. You can install them in minutes and remove them nightly, but the clips create pressure points that can damage hair with regular use. They’re perfect for occasional wear but impractical for daily, long-term use. The clips also show through fine hair more easily than invisible wire.
| Method | Installation time | Damage risk | Lifespan | Natural appearance | DIY friendly |
| Invisible wire | 30-45 minutes | Very low | 6-8 weeks | Excellent | Yes |
| Clip-in | 5-10 minutes | Moderate | Reusable | Good | Yes |
| Tape-in | 60-90 minutes | Moderate | 6-8 weeks | Excellent | No (professional) |
| Bonded | 2-3 hours | High | 3-4 months | Excellent | No (professional) |
| Micro-ring | 2-4 hours | Moderate-high | 3-4 months | Very good | No (professional) |
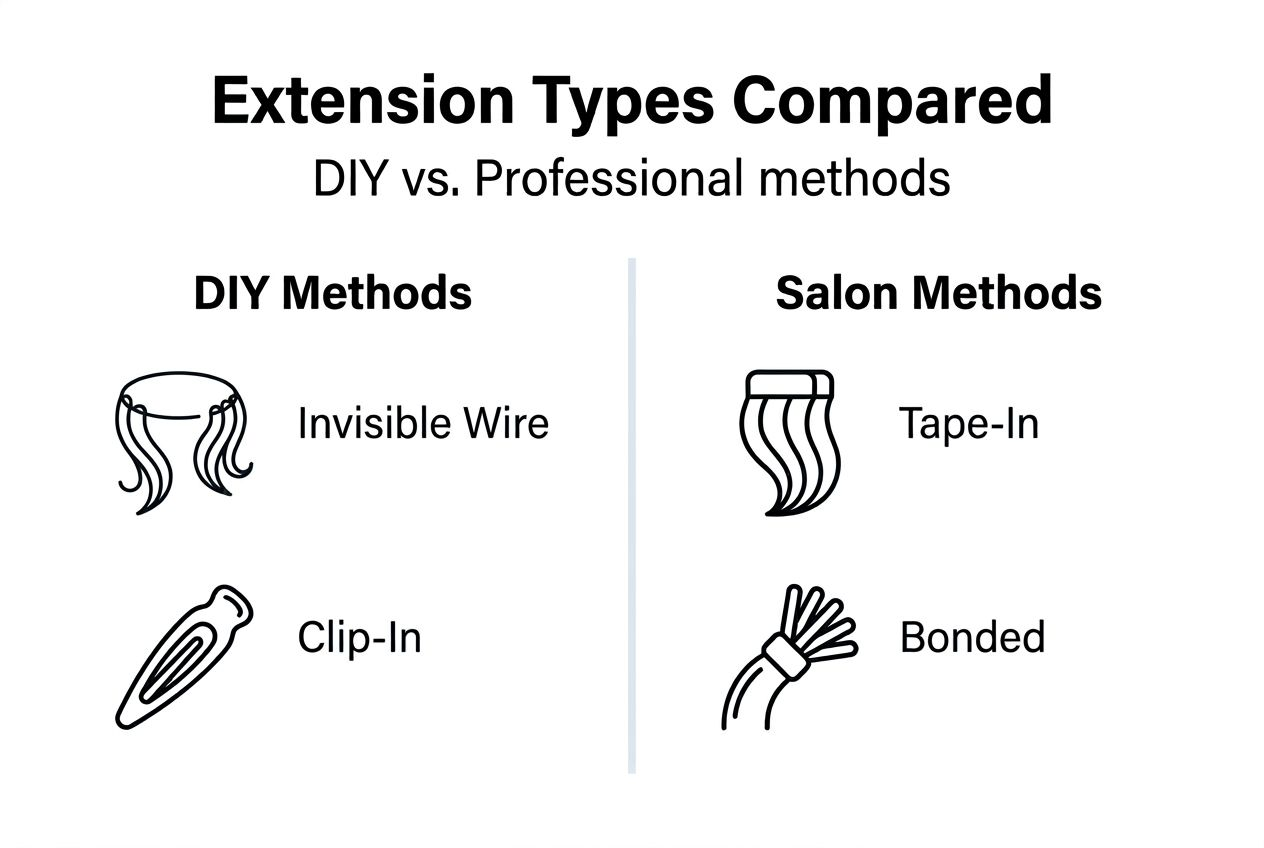
Tape-in extensions require professional application. The adhesive bonds strongly, creating seamless blending, but removal demands special solutions that can stress hair. They last similarly to invisible wire but cost significantly more when factoring in salon visits.
Bonded extensions offer the longest wear but highest risk. The keratin bonds require heat application and professional removal. Improper removal damages hair severely. They’re ideal if you want to forget about extensions for months, but the commitment and cost are substantial.
Maintenance requirements vary dramatically. Invisible wire and clip-in extensions allow you to remove them for deep conditioning your natural hair. Bonded and tape-in methods keep extensions in place during all washing and styling, requiring specialised products and techniques.
Understanding invisible wire vs clip-in extensions helps you weigh immediate convenience against long-term wearability. Your lifestyle, budget, and hair health goals guide the best choice.
Maintenance and expected outcomes
Proper maintenance separates extensions that look fresh for weeks from those that become obvious and tatty quickly.
Daily brushing prevents the tangling that ruins extensions. Use a soft bristle brush specifically designed for extensions, starting from the ends and working upward gently. Never brush aggressively from roots downward. This tears both extensions and your natural hair.
Essential maintenance routine:
-
Brush extensions twice daily using gentle downward strokes from mid-length to ends
-
Wash hair 2 to 3 times weekly with sulphate-free shampoo formulated for extensions
-
Apply conditioning treatments to mid-lengths and ends, avoiding the wire attachment areas
-
Sleep with hair in a loose braid or low ponytail to prevent overnight tangling
-
Avoid swimming in chlorinated water or use a protective swim cap
Conditioning requires special attention. Remy human hair needs moisture to maintain its lustre and softness. Apply conditioner from mid-shaft to ends, carefully avoiding the wire areas where product can cause slipping. Extensions maintain integrity and natural appearance for at least 8 weeks with proper maintenance.
Heat styling remains possible but requires caution. Use heat protectant spray before any styling tools. Keep temperatures below 150°C to prevent damage. The extensions can handle styling, but excessive heat shortens their lifespan and dulls their appearance.
Nighttime protection prevents morning disasters. Never sleep with wet extensions. The combination of moisture, friction, and hours of movement creates tangles that are difficult or impossible to remove. Tie hair loosely before bed, using fabric scrunchies rather than tight elastics.
Following comprehensive hair extension maintenance tips preserves both your investment and your natural hair health. Replace or remove extensions at the first sign of matting, excessive shedding, or discomfort.
Expected outcomes and cost considerations
Understanding realistic expectations prevents disappointment and helps you budget appropriately.
Installation time improves with practice. Your first attempt may require the full 45 minutes as you perfect sectioning and wire placement. By your third installation, expect to complete the process in 30 to 35 minutes. Experienced users often finish in under 30 minutes.
| Investment aspect | Details |
| Extension cost | £80-£250 depending on length, volume, and quality |
| Installation cost (DIY) | £0 (your time only) |
| Installation cost (salon) | £150-£400 per session |
| Maintenance products | £20-£40 monthly |
| Expected lifespan | 6-8 weeks per installation |
| Reuse potential | 2-3 times with proper care |
Home installation delivers substantial savings. A single salon visit for similar extensions costs £150 to £400. Learning to install them yourself eliminates this recurring expense. Over a year, DIY installation saves £900 to £2,400 compared to professional services.
Value calculation factors:
-
Premium invisible wire Remy human hair costs more initially but lasts longer and looks more natural
-
Cheaper synthetic or poor-quality extensions require more frequent replacement
-
Reusable extensions reduce per-wear cost significantly
-
Time saved avoiding salon appointments has value beyond money
Results meet expectations when you start with quality materials. You’ll achieve natural, fuller hair that moves freely and blends seamlessly. The extensions add volume and length without the bulkiness or obvious appearance of lower-quality alternatives.
Weight distribution affects comfort. Properly installed invisible wire extensions feel virtually weightless because they distribute evenly across multiple sections. You shouldn’t feel pulling or pressure on any single area. If you do, the installation needs adjustment.
Deciding should I get hair extensions involves weighing these practical considerations against your hair goals and lifestyle. The investment pays dividends when you achieve the confident, effortless look you’ve been seeking.
Explore premium invisible wire hair extensions
Ready to transform your hair with the quality and ease this guide promises? Naturyl Extensions delivers exactly that.
We specialise in Remy human hair invisible wire extensions that embody everything you’ve learned here: quick installation, minimal damage, and strikingly natural results. Our ethical sourcing meets rigorous UK standards, ensuring you receive sustainable, premium quality with every order.
Explore our complete range of premium hair extensions UK options, from invisible wire systems to complementary styling products. Each product comes backed by expert guidance and our commitment to your hair health. Need help selecting the perfect match? Our ethical hair extension selection guide walks you through choosing extensions that align with your values and hair goals, making your decision effortless and confident.
FAQ
Which hair types are best suited for invisible wire extensions?
Invisible wire extensions work best on healthy, medium to thick hair that provides secure attachment points and natural blending. The wire grips more effectively when your natural hair has sufficient density to support the extension weight. Thinner hair requires extra careful sectioning and may benefit from using fewer extensions placed strategically for volume rather than full coverage.
How long does it take to install invisible wire hair extensions at home?
Typical installation takes between 30 to 45 minutes depending on your experience level and hair length. First-time users should expect closer to 45 minutes whilst they perfect sectioning and wire placement techniques. With practice, most users complete installation in 30 minutes. Proper preparation, including detangling and organizing tools beforehand, significantly reduces total time.
What are the main signs that extensions are causing damage?
Look for increased hair breakage near attachment sites, scalp irritation, or persistent tension discomfort as primary damage indicators. Visible gaps or thinning around extension areas signal that your natural hair is stressed beyond its capacity. Any of these symptoms require immediate extension removal and a consultation period to assess damage extent before reinstalling.
Can I reuse invisible wire hair extensions safely?
Yes, with proper maintenance and gentle removal, quality invisible wire extensions can be reused two to three times without compromising their appearance or your hair health. Clean extensions thoroughly after removal using sulphate-free shampoo and allow them to air dry completely. Store them flat in a cool, dry place away from direct sunlight to maintain their quality between uses.


