


Noticed your hair feeling a bit flat or wishing you could switch up your look without the long salon wait? Women across the United Kingdom are choosing tape-in hair extensions for quick and natural-looking transformations that respect the health of their own hair. Thanks to medical-grade adhesive tape, these extensions are lightweight, gentle, and simple to apply at home, making it easy to enjoy lush, beautiful hair without risk of damage. Discover how this modern method delivers seamless results you can trust.
Table of Contents
- What Are Tape-In Extensions?
- Types of Tape-In Hair Extensions Available
- How Tape-In Extensions Are Applied
- Maintenance, Longevity, and Removal Process
- Comparing Tape-Ins With Other Extension Options
Key Takeaways
| Point | Details |
|---|---|
| Tap-In Extensions | They are easy to apply, comfortable, and provide a natural look while being gentle on your hair. |
| Reusability | Tape-in extensions can be reused multiple times, making them a cost-effective choice over time. |
| Maintenance | Simple maintenance routines help preserve the quality and longevity of the extensions without requiring specialist products. |
| Comparison to Other Methods | Tape-ins offer a balance of ease, comfort, and affordability compared to other extension methods such as clip-ins or sew-ins. |
What Are Tape-In Extensions?
Tape-in hair extensions are strips of real human hair bonded to your natural hair using medical-grade adhesive tape. Unlike other extension methods that require heat, chemicals, or complex installation procedures, tape-ins offer a straightforward approach to adding volume and length. The adhesive strips attach to small sections of your hair, sitting flat against your scalp, which means they’re comfortable to wear and virtually invisible when properly placed. This method has become increasingly popular amongst UK women who want transformative results without spending hours in a salon or risking damage to their natural hair.
What makes tape-ins stand out is their practicality. The lightweight design of tape-in extensions means they don’t put excessive stress on your hair roots, making them one of the gentlest options available. You’re working with real Remy human hair, so the extensions blend seamlessly with your natural texture and move exactly as your own hair would. Unlike permanent bonding methods, tape-ins are reusable, which makes them far more economical over time. When you visit Naturyl Extensions, you’ll find high-quality tape-in options crafted from ethically sourced Remy hair that’s designed to last through multiple applications with proper care. The installation process takes significantly less time than other methods, and you can typically have fuller, longer hair within an hour or two.
The adhesive used in tape-in extensions is designed specifically for hair application, featuring a gentle yet secure hold that won’t damage your strands when removed and reapplied correctly. Because the tape sits flush against your hair, it creates a natural-looking result where the extensions are virtually undetectable, even when your hair is worn up in a ponytail or styled with layers. This matters enormously if you’re looking for a realistic transformation rather than an obviously artificial appearance. You’ll also appreciate the fact that tape-ins allow your natural hair to breathe between applications. Since the adhesive doesn’t require heat or chemical processing to bond, your hair remains healthier throughout the extension-wearing period.
Tape-in extensions work well for various hair concerns and styling goals. Whether you’re adding volume to fine hair, extending length for a special occasion, or filling gaps where your hair has thinned, tape-ins provide flexibility. If you’re curious about how tape-ins compare to other methods available, understanding the different types of temporary hair extensions can help you decide if this method suits your specific needs. Many women find they integrate tape-ins into their routine remarkably easily, adapting to their presence within just a few days of wearing them.
Pro tip: When you first try tape-in extensions, apply them starting with just a few sections to see how your hair responds before committing to a full head application. This helps you learn the placement process and ensures you’re comfortable with the look and feel before investing in a larger set.
Types of Tape-In Hair Extensions Available
When you’re exploring tape-in extensions, you’ll discover that not all options are created equal. The primary distinction comes down to the hair material itself. Human hair tape-in extensions offer the most realistic appearance and superior styling flexibility, allowing you to curl, straighten, and colour your extensions just as you would your natural hair. Synthetic tape-ins, conversely, are significantly more affordable but come with limitations. They don’t hold styles as well, can’t be heat-styled, and typically don’t last as long through repeated applications. Most UK women seeking a natural aesthetic choose human hair options because the investment in quality extensions pays off through longevity and versatility. At Naturyl Extensions, we specialise in premium Remy human hair tape-ins that blend seamlessly with your natural locks and maintain their quality through multiple applications.
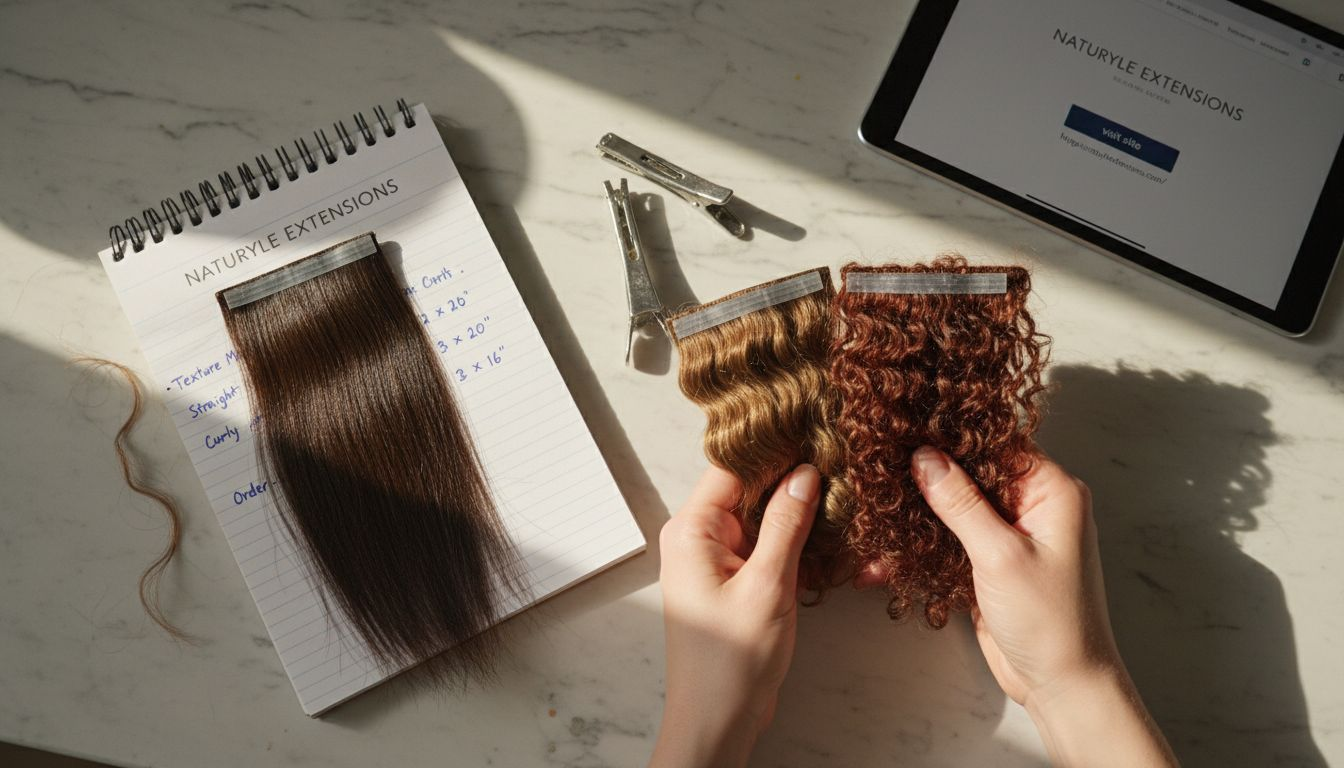
Within human hair tape-in extensions, you’ll find variations based on texture, length, and colour. Whether your natural hair is straight, wavy, or curly, you can find tape-in extensions that match your specific texture profile. Length options typically range from 14 inches to 24 inches, depending on how much extension you need. Colour selection is equally diverse, from natural shades like blonde, brunette, and black to fashion colours if you’re feeling adventurous. Some women opt for face-framing layers using clip-in extensions to add dimension and volume without committing to a full head of tape-ins, which can be an excellent starting point if you’re new to extensions. The key is matching your extensions to your hair type so they blend invisibly and feel like part of your natural hair.
Another crucial factor is the adhesive tape quality. Not all adhesive tapes perform equally, and this directly impacts how comfortable your extensions feel and how long they last. Medical-grade, skin-safe adhesive tapes are essential for ensuring your extensions stay secure without irritating your scalp or causing damage when removed. Some tapes are specifically designed for sensitive skin, whilst others prioritise long-term wear if you’re planning to keep your extensions in for several weeks. Premium tape-ins use breathable adhesive that allows your scalp to breathe, reducing the risk of buildup or irritation. The quality of the tape also affects reusability. High-quality adhesive tapes mean you can remove and reapply your extensions multiple times without compromising the bond or damaging your hair. When you’re comparing different types of hair extension methods, pay close attention to what adhesive each type uses, as this often determines whether extensions are truly gentle on your natural hair.
You’ll also encounter variations in tape application design. Some tape-in extensions come with pre-taped sections ready for application, whilst others require you to apply the tape yourself. Pre-taped options are more convenient and reduce the learning curve, making them ideal if you’re applying extensions for the first time. Hand-tied tape-ins, where individual strands are woven together before taping, offer a lighter, more natural feel because there’s less bulk at the roots. Root-blended tape-ins feature darker roots with lighter ends, which is brilliant if you want to disguise the tape line or add dimension without additional products. The choice depends on your comfort level with application and your styling preferences.
Pro tip: Start with a smaller number of tape-in sections (around 8 to 10) to get comfortable with wearing them before committing to a full head, and always choose human hair with quality medical-grade adhesive for the best balance of longevity and hair health.
How Tape-In Extensions Are Applied
The application process for tape-in extensions is straightforward, which is one of the reasons they’ve become so popular amongst UK women seeking quick transformations. The entire procedure typically takes between 30 to 90 minutes depending on how many sections you’re adding and whether you’re doing it yourself or visiting a professional. Unlike more complex extension methods, tape-ins don’t require heat, chemicals, or specialist equipment beyond what you’d normally have at home. The basic principle involves sectioning your natural hair into small parts and sandwiching each section between two pieces of tape-in hair extension strips, then pressing the adhesive tape firmly together. This creates a secure bond that sits flat against your scalp and becomes virtually invisible once blended with your natural hair.
Before you begin the actual application, proper preparation is essential. Start by washing your hair thoroughly with clarifying shampoo to remove any product buildup, oils, or residue that might interfere with the adhesive bond. Dry your hair completely, as moisture will prevent the tape from adhering properly. Section your hair into manageable parts using clips, starting from the bottom and working upwards. You’ll want to create horizontal sections about the width of the tape-in extension strip itself, typically around 1 to 1.5 inches wide. The key is precise tape placement and gentle application technique to ensure the adhesive bonds securely without creating tension on your hair roots. Take your time with this step; rushing through sectioning is one of the most common mistakes people make when applying extensions themselves.
Once your hair is sectioned, take a tape-in extension strip and peel back the plastic liner from one side of the adhesive tape. Place a small section of your natural hair onto the exposed adhesive, ensuring the tape sits close to your roots but not directly on the scalp. Then peel back the second plastic liner and press the remaining tape-in strip firmly onto your hair section, sandwiching your natural hair between the two adhesive sides. Press down for several seconds with firm, even pressure to activate the bond. Move slowly down your head, repeating this process for each section. If you’re adding extensions around your face, be extra careful to position them discreetly so they blend with your natural hairline. Many women find it helpful to use a mirror or ask a friend to help with the back sections where visibility is limited. The entire application should feel comfortable; you shouldn’t experience any pulling or tension once the extensions are properly bonded.
After application, allow the adhesive to set fully before styling your hair. Most tape-in extensions reach their maximum bond strength after 24 to 48 hours, so it’s wise to avoid washing your hair immediately after application if possible. Once the tape has cured, you can style your extensions normally, though you’ll want to be gentle when brushing near the tape lines to avoid loosening them. Regular maintenance helps extend the life of your tape-ins significantly. When you’re ready to remove them, use a specialised extension remover or gentle adhesive dissolver, applying it along the tape seam and allowing it to break down the bond before gently peeling the tape away from your hair. Never yank or force the extensions off, as this can damage your natural hair. At Naturyl Extensions, we provide detailed care instructions with every purchase to help you maintain your extensions properly and maximise their lifespan through multiple applications.
Pro tip: Always apply tape-in extensions when your hair is completely dry and freshly washed, and consider having a friend help with back sections for better accuracy and placement, especially on your first application.
Maintenance, Longevity, and Removal Process
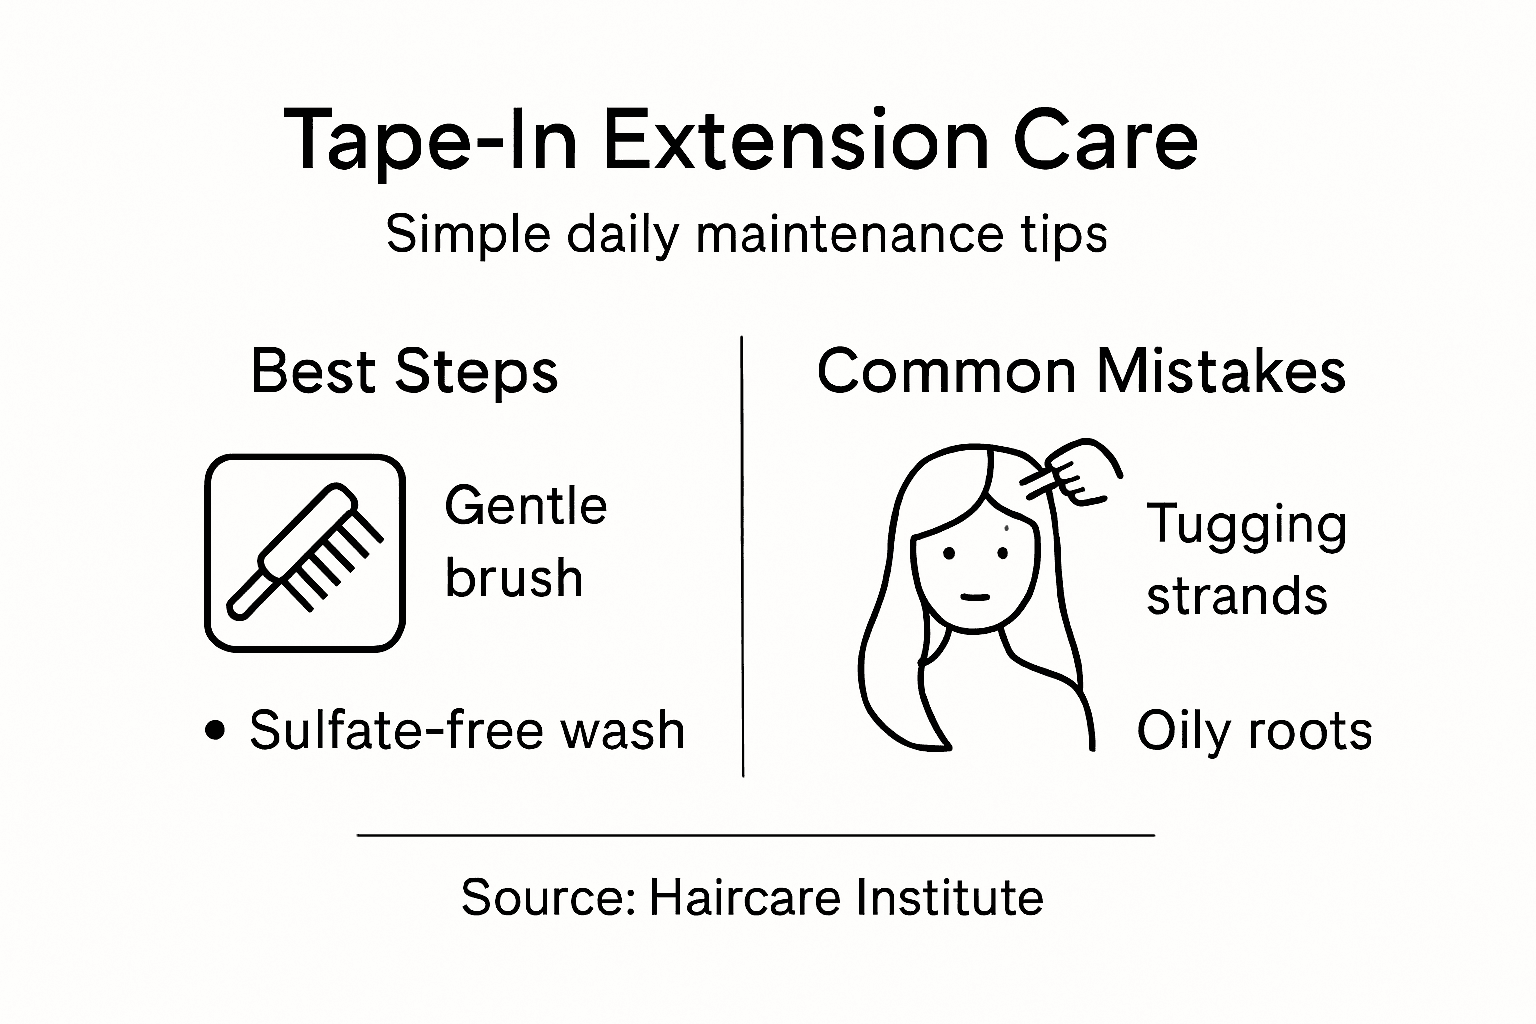
Keeping your tape-in extensions in pristine condition requires consistent care, but the good news is that the maintenance routine is straightforward and doesn’t demand specialist products or complicated procedures. Your primary concern is protecting the adhesive tape bond whilst keeping both your extensions and natural hair clean and healthy. Wash your hair gently with sulphate-free shampoo and conditioner, focusing on the ends rather than the roots where the tape sits. When you shower, avoid directing hot water directly onto the taped sections, and be extra cautious when conditioning around the tape lines. The adhesive bond is most vulnerable when wet, so handle your hair carefully during washing and avoid vigorous rubbing. Many women find it helpful to tie their hair into a loose braid or bun whilst washing to minimise movement around the tape sections. You’ll want to skip heavy oils and silicone-based products near the tape, as these can break down the adhesive prematurely and cause the extensions to slip or separate from your natural hair.
Tape-in extensions typically last between 6 to 8 weeks before they need reapplication, though this timeframe can vary depending on your hair growth rate, how well you’ve maintained them, and your daily styling habits. As your natural hair grows, the taped sections gradually move further from your scalp, which is completely normal. At around the 6 to 8 week mark, you’ll notice the extensions starting to feel less secure and the tape becoming less adhesive. This is your signal that it’s time for removal and reapplication. The longevity of your extensions is directly connected to proper maintenance routines and careful handling techniques throughout the wearing period. Some women extend the life of their tape-ins slightly by having them repositioned by a professional, which involves carefully removing them, cleaning the tape, and reapplying them to new sections of natural hair. This process is more affordable than purchasing entirely new extensions and allows you to maximise your investment.
Removing tape-in extensions incorrectly is one of the quickest ways to damage your natural hair, so this step deserves your full attention. Never yank or pull the extensions away from your head, no matter how tempting it might be. Instead, invest in a quality adhesive remover or extension dissolver, which you can find at most beauty suppliers or from Naturyl Extensions when you purchase your extensions. Apply the remover generously along the tape seams, allowing it to saturate and break down the adhesive bond for several minutes. You’ll see the adhesive begin to soften and become tacky. Once it’s properly dissolved, gently peel the tape away from your hair using slow, deliberate movements. If you encounter resistance, apply more remover and wait a bit longer rather than forcing the tape off. The entire removal process should feel controlled and comfortable. After removal, your hair may feel slightly sticky from residual adhesive, so wash it thoroughly with clarifying shampoo to remove any remaining product.
One of the brilliant advantages of tape-in extensions is their reusability. Once you’ve removed them, you can clean the old tape and reapply the extensions to fresh sections of natural hair, effectively extending the life of your investment significantly. To prepare extensions for reapplication, gently wipe the tape with a lint-free cloth to remove any hair strands or debris, then store them in a cool, dry place away from direct sunlight. Some people choose to refresh the tape by applying new adhesive strips over the old ones, though this varies depending on the extension type. Careful removal techniques and professional-grade adhesive removers ensure both your natural hair and extensions survive the removal process intact and ready for reuse. At Naturyl Extensions, we recommend having your first removal done by a professional if you’re uncertain, as learning the correct technique prevents costly damage to your hair and extensions.
Here’s a concise summary of essential care steps and expected lifespan for tape-in hair extensions:
| Care Step | Key Benefit | Common Mistake | Recommended Frequency |
|---|---|---|---|
| Gentle shampooing | Preserves adhesive strength | Using sulphate shampoo | 2-3 times weekly |
| Careful conditioning | Prevents tape slippage | Applying to roots | With every wash |
| Tape line protection | Extends wear time | Rubbing or pulling tapes | Always, during wash |
| Routine reposition | Maintains comfort | Skipping maintenance | Every 6-8 weeks |
| Professional removal | Protects natural hair health | Forcing tape off | At reapplication |
Pro tip: Schedule your tape-in removals for when you can rest your hair for a day or two afterwards, allowing your scalp to recover and any slight irritation to settle before reapplying new sections.
Comparing Tape-Ins With Other Extension Options
When you’re deciding on hair extensions, tape-ins deserve serious consideration alongside other popular methods. The extension landscape offers several choices, each with distinct advantages and drawbacks. Clip-in extensions are the most affordable and non-committal option, allowing you to remove them daily. However, they often create a noticeable ridge along your hairline, can slip during active movement, and require daily application and removal. Keratin-bonded extensions use heat and glue to permanently attach hair to your strands, offering seamless results but requiring professional application and removal. The heat process can damage your natural hair, particularly if you have fine or previously damaged strands. Micro-ring extensions involve small metal rings clamped onto sections of hair, providing a more secure hold than clips but creating visible bumps and requiring frequent tightening as your hair grows. Sew-in extensions involve braiding your natural hair and stitching extensions into the braids, which offers excellent longevity but can cause significant tension alopecia if worn too tightly or for extended periods. Understanding how tape-ins fit into this broader spectrum helps you make an informed choice.
Tape-in extensions occupy a sweet spot in the extension hierarchy, balancing ease of application with natural results and hair health. Unlike clip-ins, tape-ins stay securely in place all day and night without slipping or creating ridge lines, giving you that seamless blended appearance you’re after. Unlike keratin bonds and sew-ins, tape-ins don’t require heat, chemicals, or braiding that could stress your hair or scalp. The medical-grade adhesive tape used in tape-in extensions provides a gentle yet secure bond that holds through washing, styling, and daily wear without the damaging intensity of heat-activated keratin bonds. Application is quick and straightforward, taking 30 to 90 minutes depending on how many sections you’re adding, whereas keratin bonds and sew-ins can take several hours. Most importantly, tape-ins are reusable. You can remove and reapply them multiple times, making them far more economical than keratin or sew-in extensions, which require complete replacement after removal. This reusability factor is particularly appealing if you’re budget conscious or want flexibility in your hair journey.
The comfort factor genuinely matters when you’re wearing extensions daily. Tape-ins feel lightweight and natural once applied, sitting flat against your scalp with minimal bulk at the roots. Clip-ins, by contrast, can feel heavy and cause tension headaches if worn for extended periods. Micro-rings create a noticeable bumpy texture you can feel and sometimes see, particularly if your hair is pulled back. Sew-in extensions can cause scalp tension and discomfort, especially around the braided sections. Keratin-bonded extensions feel seamless but require vigilant care to prevent damage. Tape-in extensions are preferred by many for their natural feel and lightweight design, offering longer wear than clip-ins with less scalp stress than sew-ins or tight braids. Maintenance is straightforward too. Clip-ins require daily care and can accumulate product buildup on the clips. Keratin bonds need specialist shampoos and regular salon visits to prevent damage. Tape-ins simply need gentle washing with sulphate-free products and occasional professional repositioning if desired. This lower maintenance profile appeals to busy women who want beautiful hair without complicated routines.
Cost is another crucial consideration when comparing extension types. Initial investment varies significantly. Clip-in extensions are cheapest upfront, typically costing £30 to £80 for a set. Tape-in extensions usually range from £80 to £200 depending on the quality and length. Keratin-bonded extensions cost between £150 to £400, with additional expenses for professional application and removal. Sew-in extensions fall somewhere in the middle at £100 to £300, though you’re paying for professional installation. However, total cost of ownership tells a different story. Because tape-in extensions are reusable, you can wear the same set for 6 to 12 months with periodic repositioning, making them incredibly cost effective long term. Keratin and sew-in extensions require complete replacement after removal, so costs accumulate quickly. Clip-ins seem cheap initially but require frequent replacement as they degrade with daily use. If you’re looking for different types of hair extension methods that balance affordability with results, tape-ins offer exceptional value when you factor in reusability and longevity. At Naturyl Extensions, our tape-in options are competitively priced and come with free exchange policies, adding further value to your investment.
Use this comparison to evaluate different hair extension methods at a glance:
| Method | Application Duration | Main Pros | Notable Cons |
|---|---|---|---|
| Tape-in Extensions | 30–90 minutes | Reusable, natural-looking, gentle | Needs occasional reposition |
| Clip-in Extensions | 10–15 minutes | Easy removal, low commitment | May slip, visible ridges |
| Keratin-Bonded | 2–4 hours | Seamless, long-lasting | Requires heat, costly |
| Micro-Ring | 1–2 hours | Secure, no glue | Bumpy feel, needs tightening |
| Sew-in Extensions | 2–3 hours | High durability | Scalp tension risk |
Pro tip: If you’re torn between tape-ins and clip-ins, remember that tape-ins require a small initial investment in application time and technique learning, but pay dividends through reusability and natural appearance over several months.
Discover Effortless Volume with Premium Tape-In Extensions
If you have been searching for a gentle and natural way to add volume and length, tape-in extensions provide the perfect solution. This method addresses common challenges like avoiding damage from heat or chemicals while offering a seamless, comfortable fit that blends beautifully with your natural hair. At Naturyl Extensions, we understand your desire for a quick and damage-free transformation using high-quality, ethically sourced Remy human hair designed for reusability and lasting comfort.
Explore our extensive range of Extensions and discover the ease of achieving fuller hair with our premium tape-in options. Whether you want to enhance your look for a special occasion or everyday wear, our fast UK delivery and free exchange policy ensure a hassle-free experience. Visit Naturyl Extensions today to start your journey towards stunning, natural-looking hair that feels as good as it looks.
Frequently Asked Questions
What are tape-in extensions?
Tape-in extensions are strips of real human hair that are bonded to your natural hair using medical-grade adhesive tape. They provide a simple and effective way to add volume and length without the need for heat or chemicals.
How long do tape-in extensions typically last?
Tape-in extensions usually last between 6 to 8 weeks before they need to be reapplied. This duration can vary based on your hair growth rate and how well you maintain them.
Are tape-in extensions damaging to natural hair?
Tape-in extensions are one of the gentlest options available, as they do not require heat or harsh chemicals. The medical-grade adhesive tape is designed to bond securely without causing damage when applied and removed correctly.
How do you apply tape-in extensions at home?
To apply tape-in extensions, wash and dry your hair thoroughly, section it into small parts, and sandwich your hair between two strips of the extension tape. Press them firmly to ensure a secure bond, and avoid washing your hair for 24 to 48 hours after application to allow the adhesive to set.


